AVIATION GPS
Pilot's manual for the Android app — a panel-GPS-style navigator for your phone.
1. Introduction
Aviation GPS turns your phone into a navigation aid modelled on the Garmin GNS 430. The screen is split into an upper and a lower section, each with its own row of seven page buttons. You choose which page each button shows, so you can build the layout you want: a moving map over a flight plan, an HSI over a data page, or anything else.
The app works offline. Airports, navaids, runways, frequencies, airspace, coastlines, rivers, roads and cities are stored on the phone. An internet connection is used only for weather (METAR/TAF), winds, internet traffic and map data updates.
Main features:
- Moving map with airspace, terrain features, runways drawn to scale and decluttering
- HSI, RMI and CDI displays with OBS mode and a visual approach glidepath
- Flight plans with automatic leg sequencing, DIRECT TO, saved plans and user waypoints
- Airspace proximity alarms, nearest airports and navaids, airport weather
- Traffic from the OpenSky Network or from X-Plane
- Barometric altitude and vertical speed, GPS smoothing, track recording
- A built-in flight simulator with an autopilot for practice on the ground
2. Getting started
When the app starts it loads its aviation database; this takes a few seconds and shows a progress screen. The app then asks for permission to use your location. Allow it while using the app — the position is needed for everything except planning.
The screen stays on while the app is open, and the app runs in portrait only. GPS is used while the app is on screen; track recording (the LOG page) also keeps recording with the screen off.
On the first fix, if you haven't chosen a destination, the app picks the nearest airfield as the destination so the pages have something to show.
The split screen
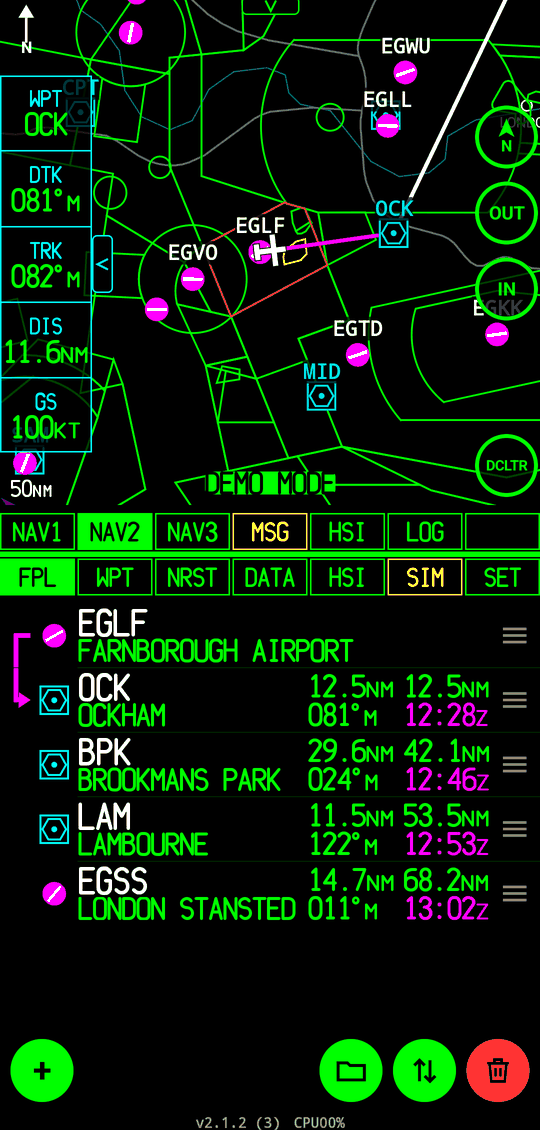
The screen has two sections separated by a green line:
- 1Upper section — here showing NAV2, the moving map.
- 2Upper tab bar — at the bottom of the upper section. The highlighted button is the page shown above it.
- 3Lower tab bar — at the top of the lower section.
- 4Lower section — here showing FPL, the flight plan.
- 5Status strip — the app version. While recording, it shows a red ● REC.
The default layout has NAV1/NAV2/NAV3/MSG/HSI/LOG on top and FPL/WPT/NRST/DATA/HSI/SIM/SET below. Both bars can show any page.
 1
2
3
4
5
1
2
3
4
5
Tab bars and slots
Tap a button to show its page in that section.
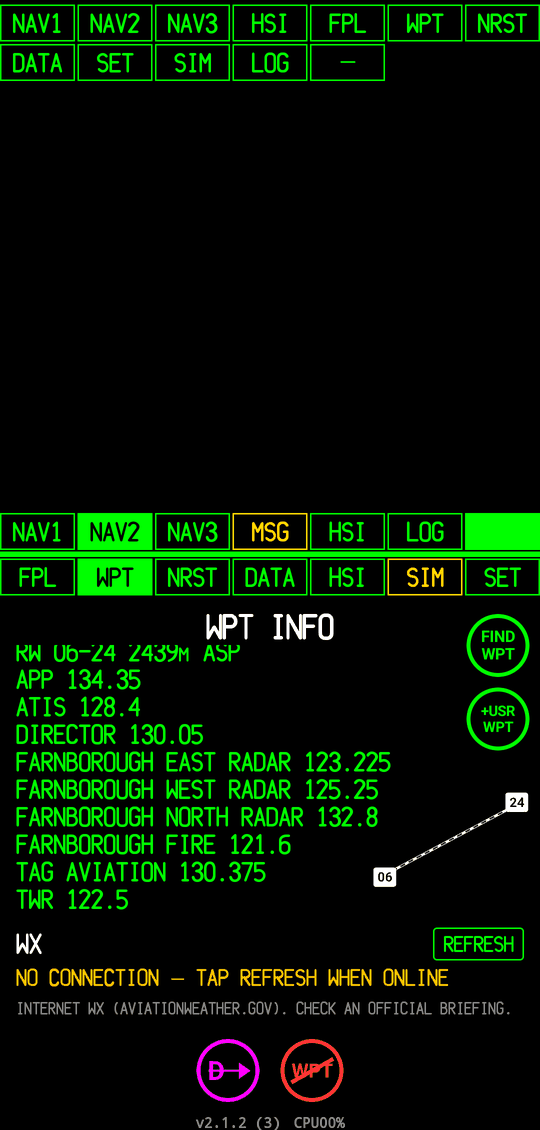
Long-press a button to change which page it shows. The page area is replaced by a list of every page; the button you are changing blinks. Tap a page to put it in the slot, or — to empty the slot. An empty slot says MODE NOT DEFINED — LONG PRESS TO CONFIGURE.
A page can only be in one slot per bar; picking a page that is already elsewhere in the bar clears the other slot. The layout is remembered.
The MSG button is fixed in the fourth slot of the upper bar and cannot be moved. It is always yellow and opens the message window (see MSG).
When a page is needed that has no slot in a bar (for example, opening a waypoint from NRST when the bar has no WPT button), the page is shown temporarily over the current one.
Colours and symbols
| Colour | Meaning |
|---|---|
| Magenta | The active leg and active waypoint, DIRECT TO, flight-plan ETAs, airports on the map |
| White | Inactive flight-plan legs, identifiers, the own-ship symbol |
| Cyan | Navaids and user waypoints, labels of data fields, the OBS course |
| Green | Values, buttons, general map lines |
| Yellow | Messages, warnings, the active SIM, airspace that has an alarm |
| Red | Airspace you are inside (alarm), destructive buttons, traffic warnings |
Waypoint symbols follow the usual chart style: a magenta circle with a runway bar for airports (the bar points along the main runway), a hexagon for VORs, a dotted circle for NDBs, and so on — the same symbols are used on the map and in every list.
Distances, speeds and altitudes are shown in the units chosen on the SET page (NM/MI/KM, KT/MPH/KM/H, FT/M). Bearings and courses are magnetic (°M), using the World Magnetic Model 2025.
3. Finding waypoints
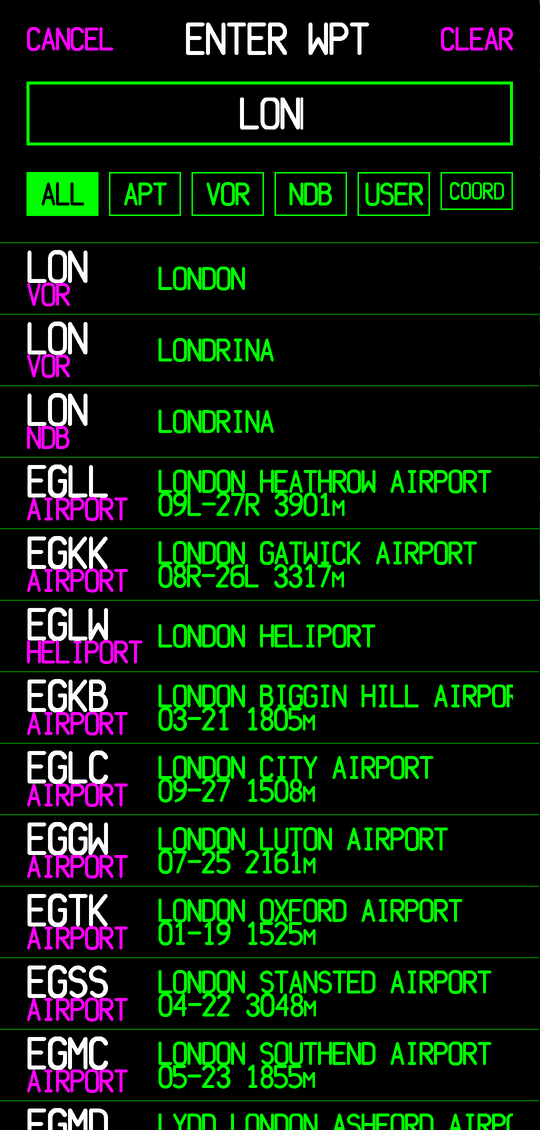
ENTER WPT
The ENTER WPT screen is used whenever you pick a waypoint: the + button on the FPL page, FIND WPT on the WPT page, or tapping the DEST field on the DATA page.
Type an identifier or a name. Results update as you type; airports are listed before navaids, exact identifier matches first. Each row shows the identifier, the type and the name, and for an airport its longest runway.
The filter buttons below the search box narrow the list:
- ALL everything, APT airports, VOR VORs, NDB NDBs
- USER your saved user waypoints. Each can be deleted here (DEL) unless it is in use; temporary ones are marked TEMP.
- COORD enter a position by latitude and longitude (below)
With an empty search box the list browses waypoints, nearest first or alphabetically (SET > SEARCH SORT). Which airports and navaids are searched is set in SET > SEARCH & DATABASE.
Tap a result to choose it. CANCEL closes without choosing; CLEAR empties the search box.
User waypoints (COORD)
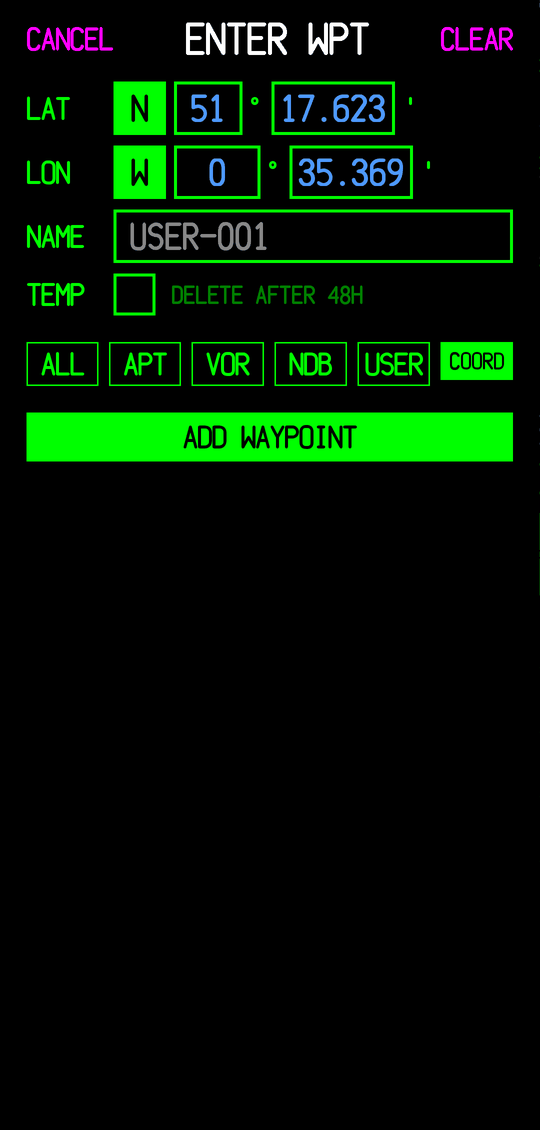
The COORD tab creates a waypoint at any position. It starts at your current position. Choose the hemispheres with the N/S and E/W buttons and type degrees and minutes (or degrees, minutes and seconds — whichever POSITION FRMT is set on the SET page). The cursor moves on to the next field automatically.
Give it a NAME (otherwise it is called USER-001, USER-002 …). Tick TEMP to have it deleted automatically 48 hours after it was created — handy for a one-off position. A temporary waypoint is never deleted while it is your destination, in the active flight plan or in a saved plan.
ADD WAYPOINT saves it and uses it. User waypoints are also created with +USR WPT on the WPT page and +USER after a long press on the map. They are shown on the map with a cyan symbol, appear in ENTER WPT's ALL and USER lists and in NRST USR.
A user waypoint can be edited (EDIT WPT) or deleted (DEL WPT) from the WPT page. Editing one that is in the flight plan moves the flight-plan waypoint too.
4. Navigating
At any time the app navigates to one destination (the active waypoint, “TO”), usually from a FROM point. Everything — the map's course line, the HSI needle, DTK, XTK, DIS, ETE — is computed from these two points. There are three ways to set them:
- DIRECT TO a waypoint;
- a flight plan, which sets TO to the active waypoint and FROM to the waypoint before it, and moves on by itself;
- tapping the DEST data field and choosing a waypoint (same as DIRECT TO).
DIRECT TO
The D→ button (on the WPT page and in the map's selection panels) flies a straight course from where you are now to the waypoint. The course is fixed when you press D→; if you drift off it, the CDI shows it, as on a panel GPS. Press D→ again to draw a new course from your present position.
- D→ to a waypoint that is already in the active flight plan flies to it within the plan. When you arrive, the plan resumes with the next leg.
- D→ to a waypoint that is not in the plan adds it to the end of the plan, marked with D→, so the plan is not lost.
- A plan with a single waypoint is flown as a DIRECT TO to it.
Flight plan (FPL)
The FPL page holds the active flight plan. Each row shows the waypoint's identifier and name and, for each leg, its distance and magnetic course (left) and the cumulative distance and ETA (right). ETAs are in UTC (Z) or local time, as set in SET > FPL ETA.
The magenta bracket on the left marks the active leg: from the waypoint at its top to the waypoint at its arrow.
Editing
- + adds a waypoint at the end (ENTER WPT).
- Swipe a row left to delete it.
- Drag the ≡ handle to move a waypoint.
- Tap a row to open the waypoint on the WPT page. From there you can make its leg the active leg (ACTV LEG), fly DIRECT TO it, or remove it.
- The ⇅ button reverses the plan, for the flight home.
- The red bin clears the plan (after a confirmation).
- The folder opens the saved flight plans.
When the plan gets its second waypoint, the first leg is activated automatically. A waypoint identical to the one before it is not added twice.
Automatic sequencing
The plan moves to the next leg when you get close to the active waypoint (a capture radius of 0.6–2 NM, larger at higher ground speeds) or when you pass abeam of it within 5 NM. After the last waypoint the plan stays on the final leg. Sequencing is suspended while OBS mode is on.
The active plan is kept when the app is closed.
Saved flight plans
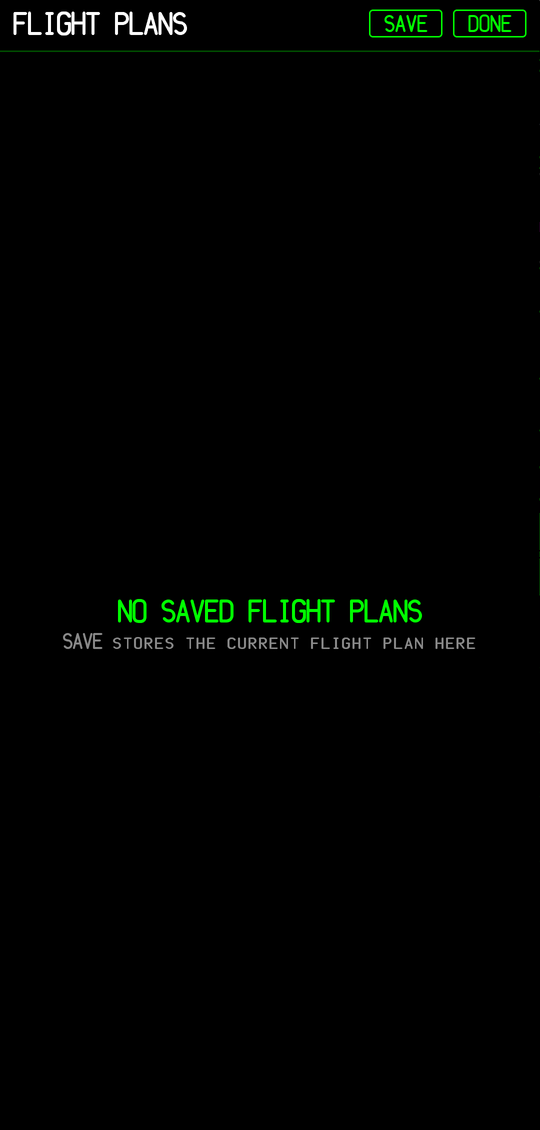
The folder button opens FLIGHT PLANS. SAVE stores the current plan under a name. Each saved plan has LOAD (it replaces the active plan, after a confirmation, and starts at leg 1) and DEL. DONE closes the list.
OBS mode
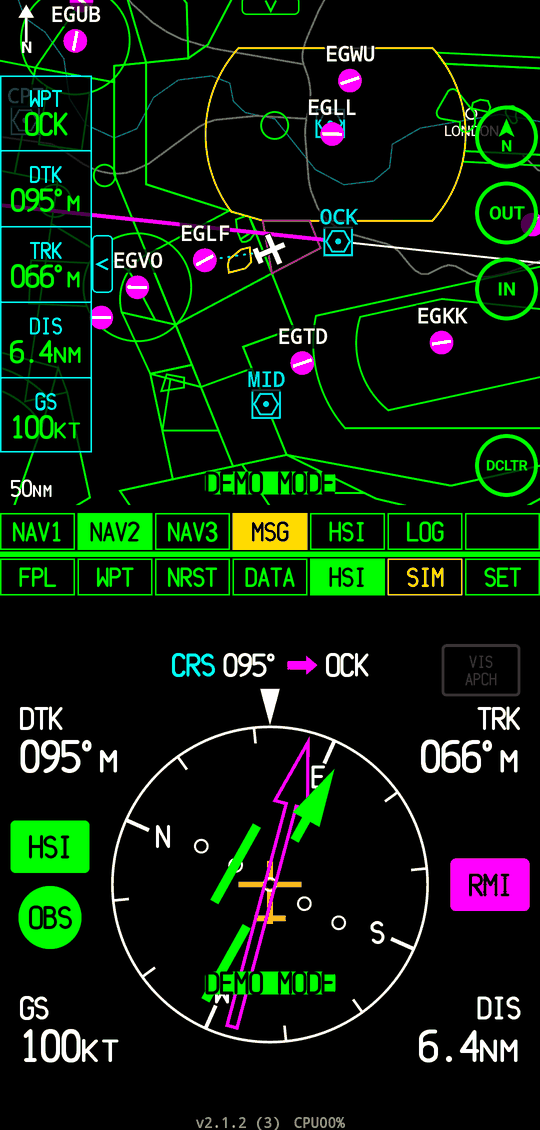
OBS mode turns the destination into a VOR-like station: instead of flying the leg, you fly a course of your choosing through the waypoint, inbound or outbound — for holds, procedure turns or intercepting a radial.
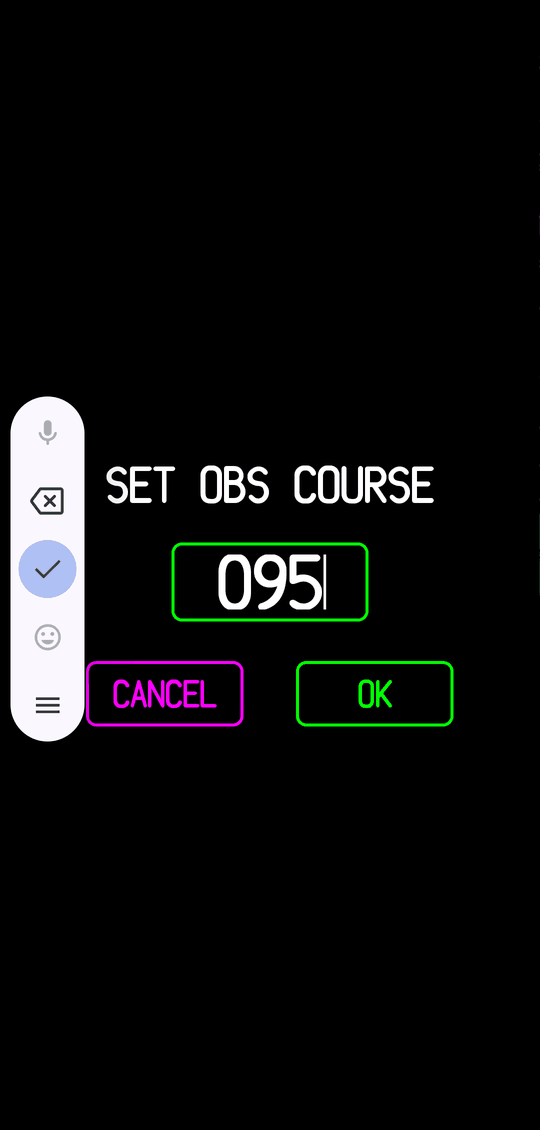
- On the HSI page, tap OBS. The first time for a waypoint the course starts at the current DTK; a keypad lets you type a course. Tap OBS again to turn it off.
- Or drag up or down on the OBS button to turn the course (0.2° per point). Dragging also turns the HSI on.
While OBS is on, the guidance label reads CRS 095° → ident, DTK shows the OBS course, and XTK, TKE, the HSI needle and the map's course line follow the selected course. The CDI full scale is three times wider than normal. The flight plan does not sequence.
Any new navigation command — D→, a new destination, any change to the active plan — turns OBS off. The last course is remembered.
SET OBS COURSE
Type a course from 000 to 360 and press OK. Pressing OK on an empty field sets 000. CANCEL leaves OBS as it was.
Visual Approach
When the destination is an airport with runways and you are within 15 NM, the VIS APCH button on the HSI page lights up. Tap it and choose a runway end. The app then guides you along the extended runway centreline to the threshold:
- DTK becomes the runway's inbound course; the HSI needle shows lateral deviation with a fixed full scale of ±0.3 NM;
- a vertical gauge shows the deviation from a 3° glidepath to the threshold (when the field elevation is known);
- the maps draw the approach course.
Visual Approach and OBS exclude each other. It turns itself off beyond 15 NM, when you choose a new destination, or when you turn the HSI off.
5. The pages
NAV1 — map with compass arc
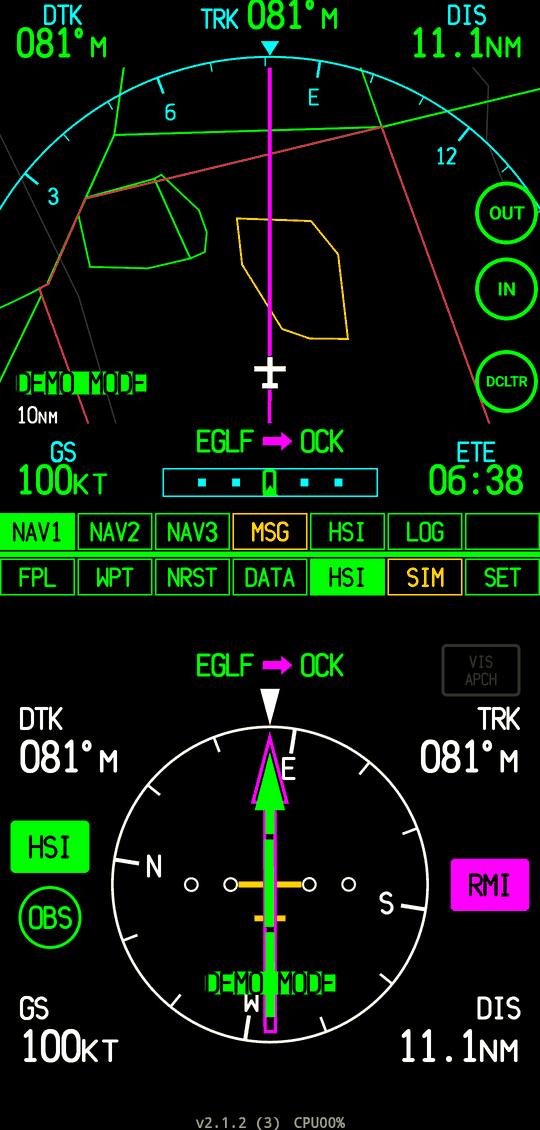
A track-up moving map with your aircraft near the bottom, under a cyan compass arc showing the current heading or track (TRK 081°M at the top). The magenta line is the course to the active waypoint.
- Four corner fields — by default DTK, DIS, GS and ETE. Long-press a field to change it.
- The guidance label (EGLF → OCK) and a horizontal CDI at the bottom.
- OUT/IN step the range from 5 to 200 NM; pinch to zoom smoothly; DCLTR declutters. NAV1 AUTOZOOM can manage the range for you.
See The moving map for everything the map shows.
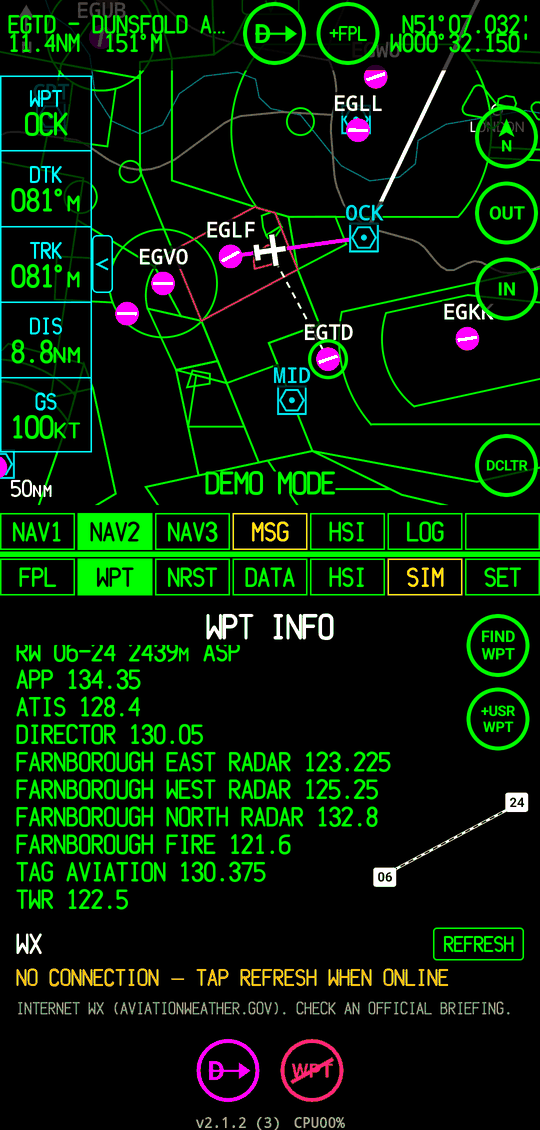
NAV2 — moving map
The main moving map, ranges from 500 ft to 2000 NM, north up, DTK up or track up.
- A field table down the left edge (WPT, DTK, TRK, DIS, GS by default). Long-press a field to change it. The < tab slides it away and back.
- The v tab at the top opens the guidance label.
- The north arrow in the top-left corner always points to true north.
- The orientation button above OUT cycles NORTH UP / DTK UP / TRACK UP. After you have panned the map, the same button re-centres it on your aircraft.
- The range is shown bottom left, with the declutter level and a wind arrow.
- Drag to pan, pinch to zoom, OUT/IN to step the range.
The yellow DEMO MODE badge appears when the position is simulated.
NAV3 — CDI and data
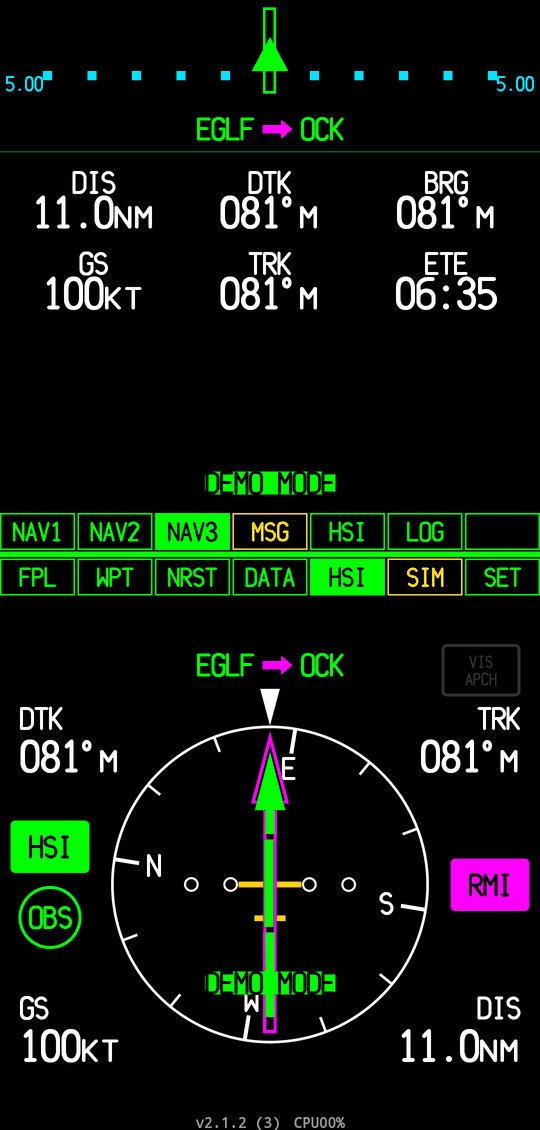
A large horizontal CDI strip at the top, the guidance label and a grid of six data fields (DIS, DTK, BRG, GS, TRK, ETE by default). Long-press a field to change it.
Tap the CDI strip to change its full-scale deflection: 5 NM, 1.25 NM or 0.25 NM. The value is shown at both ends. The needle sits on the side the course is on: if you are right of course, the needle is left — fly towards the needle.
When there is no GPS fix the page says NO GPS FIX.
HSI — compass, RMI and HSI
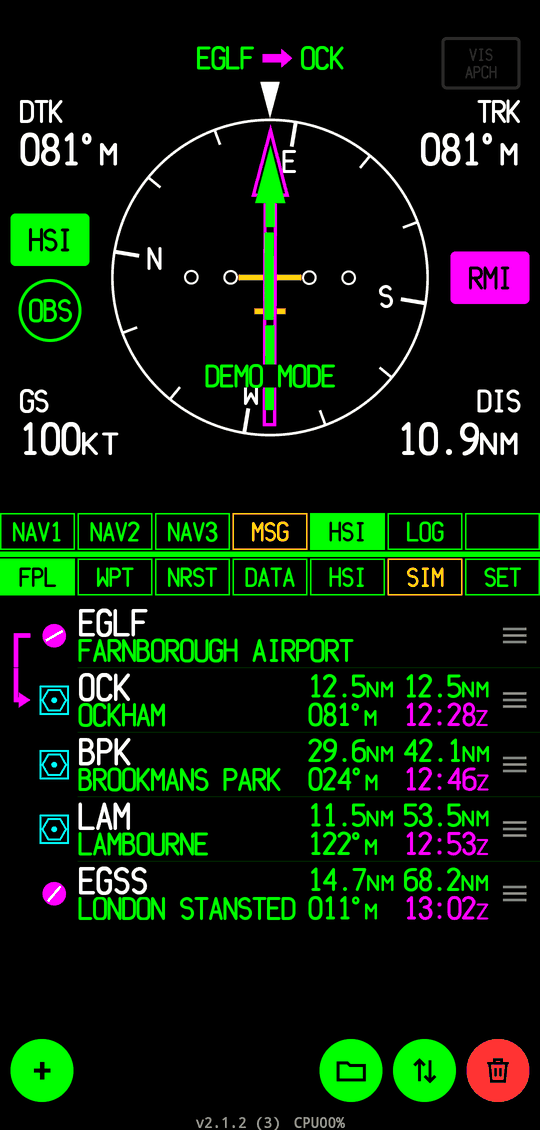
A compass card rotating with your heading or track, with:
- RMI — a magenta bearing pointer to the active waypoint. On at every start.
- HSI — the course arrow (DTK) with a deviation bar and dots, like an HSI. Each dot is a fraction of the CDI full scale; the bar travels to 1.5× full scale.
- OBS — see OBS mode.
- VIS APCH — see Visual Approach.
The green arrow is your track over the ground. The orange bar is the aircraft symbol (or a triangle, SET > POS SYMBOL).
The CDI full scale follows SET > HSI CDI SENSITIVITY: AUTO uses 5 NM more than 30 NM out, 1 NM from 30 to 2 NM, and 0.3 NM closer; or fix it at 5, 1 or 0.3 NM.
Four corner fields (DTK, TRK, GS, DIS by default) can be changed by long-press, or hidden with SET > HSI DATAFIELDS. COMPASS STYLE selects a Garmin GTN-style or Boeing 747-style card.
DATA
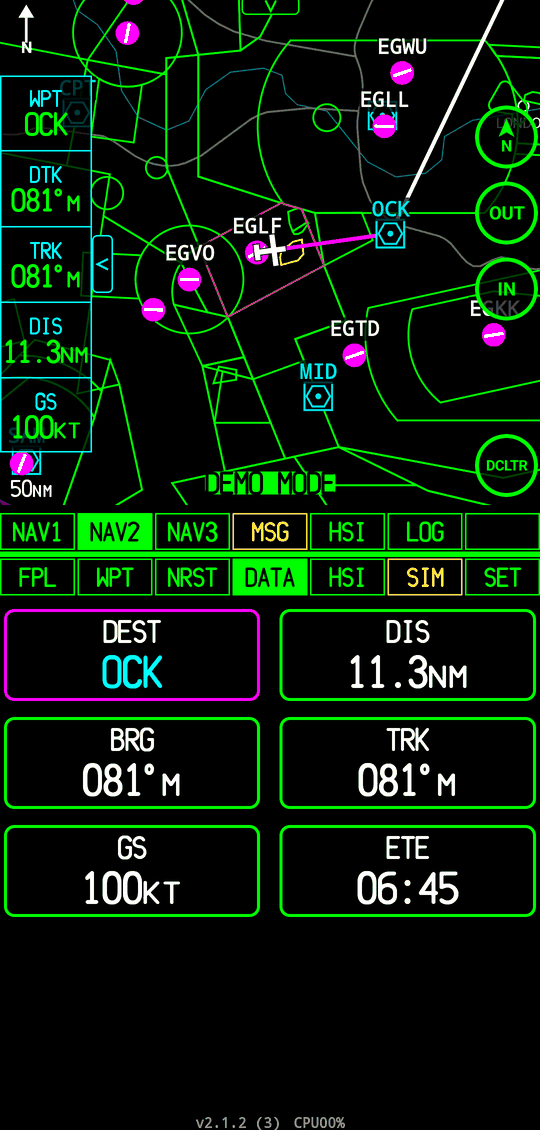
Six large data fields. Tap a field to choose what it shows from the SELECT DATA list — see Data fields. Tapping the DEST field instead opens ENTER WPT to pick a new destination (a DIRECT TO).
The default fields are DEST, DIS, BRG, HDG/TRK, GS and ETE. SET > LOAD DEFAULT DATA FIELDS replaces them with DEST, ETE, VS, ETA UTC, POS and ALT.
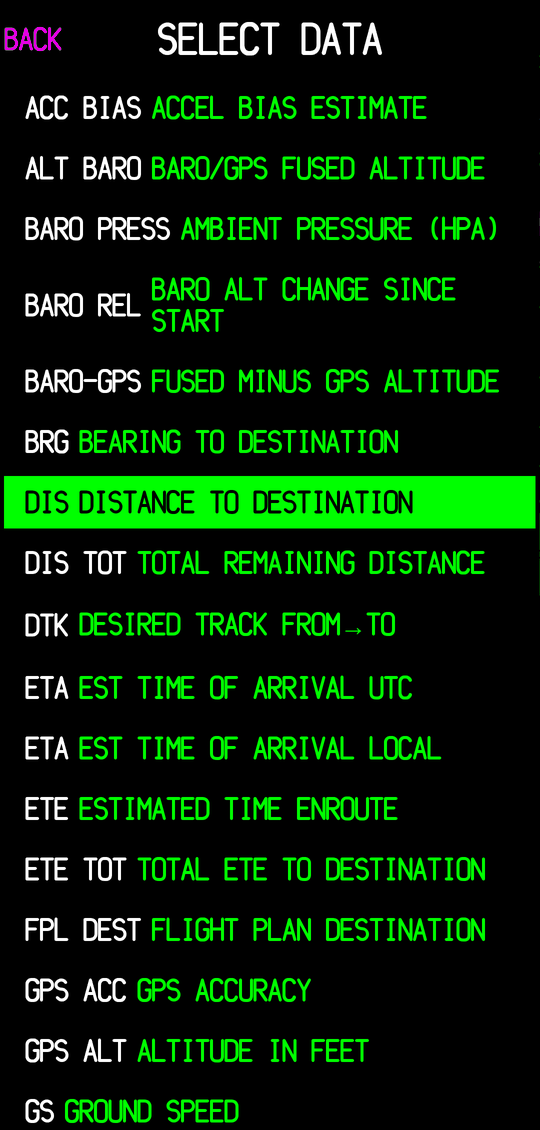
SELECT DATA
Every field type with a short description. Tap one to use it, or BACK to keep the current one. The same list is used for the HSI corners, NAV1's corners, NAV2's table and NAV3's grid.
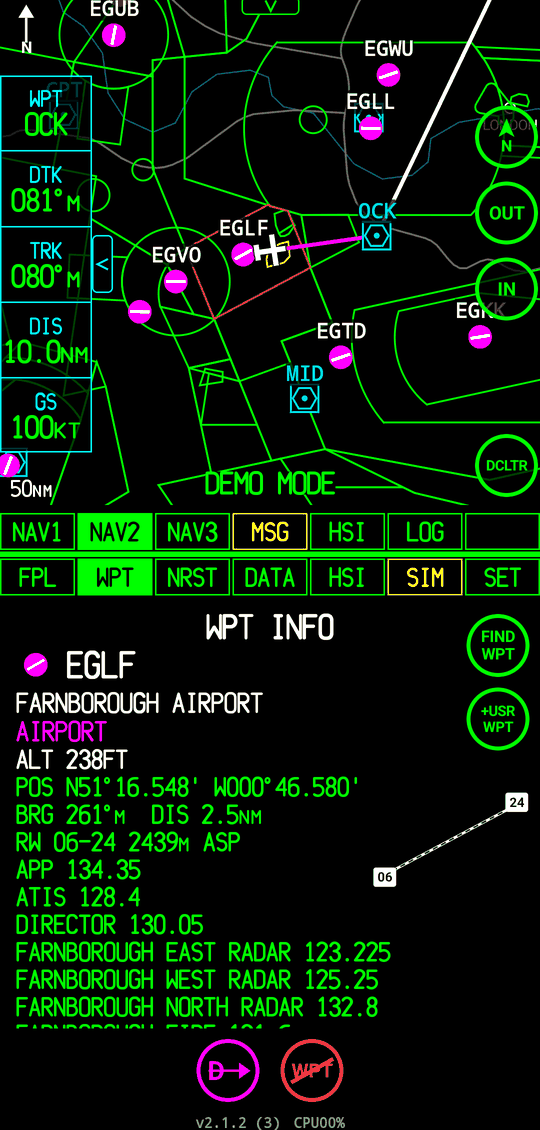
WPT — waypoint information
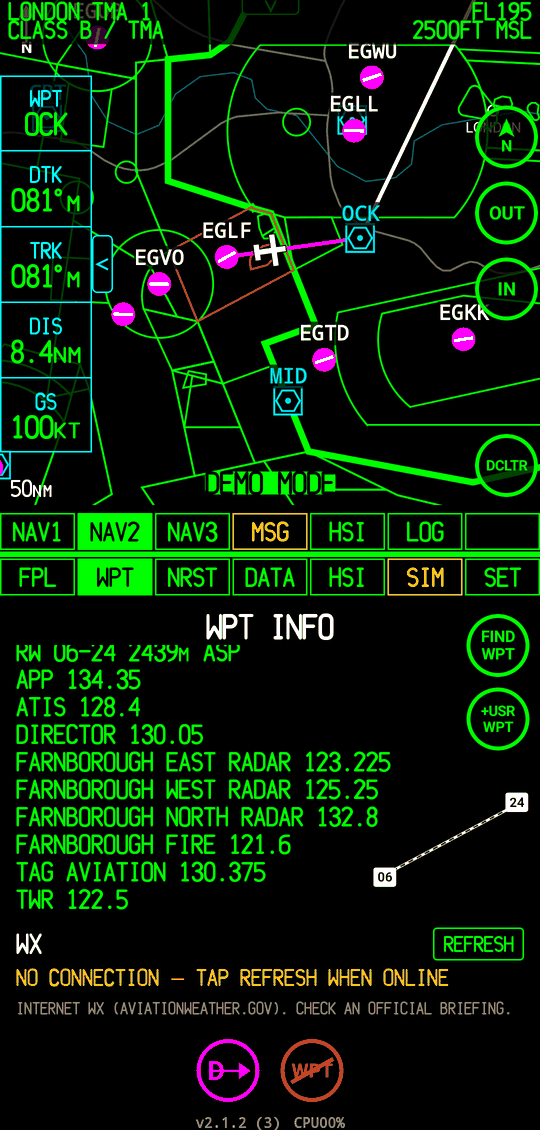
Everything about one waypoint: identifier, name and type, elevation, position, bearing and distance from you, runways (length and surface) and frequencies, a diagram of the runways, and for airports the weather.
The page shows the waypoint you opened — from the flight plan, NRST, the map's info panel — or, if nothing was opened, says NO WAYPOINT SELECTED.
Buttons
- D→ fly DIRECT TO the waypoint.
- LEG (ACTV LEG) — for a flight-plan waypoint, make its leg the active leg.
- +FPL add the waypoint to the end of the flight plan.
- W̶P̶T̶ remove it from the flight plan.
- FIND WPT look up another waypoint (ENTER WPT).
- +USR WPT create a user waypoint (COORD).
- EDIT WPT / DEL WPT for a user waypoint.
After a flight-plan action the lower bar jumps back to FPL.
Weather (WX)
For an airport, the WX block shows the latest METAR with its age and a flight-category badge (VFR / MVFR / IFR / LIFR), and the TAF split into its change groups. It comes from aviationweather.gov and is kept for 10 minutes; REFRESH fetches it again. If an airport doesn't report, the nearest reporting station within about 1° is shown and named in amber. Without a connection the last report is kept with its age; with no report at all the page says NO CONNECTION.
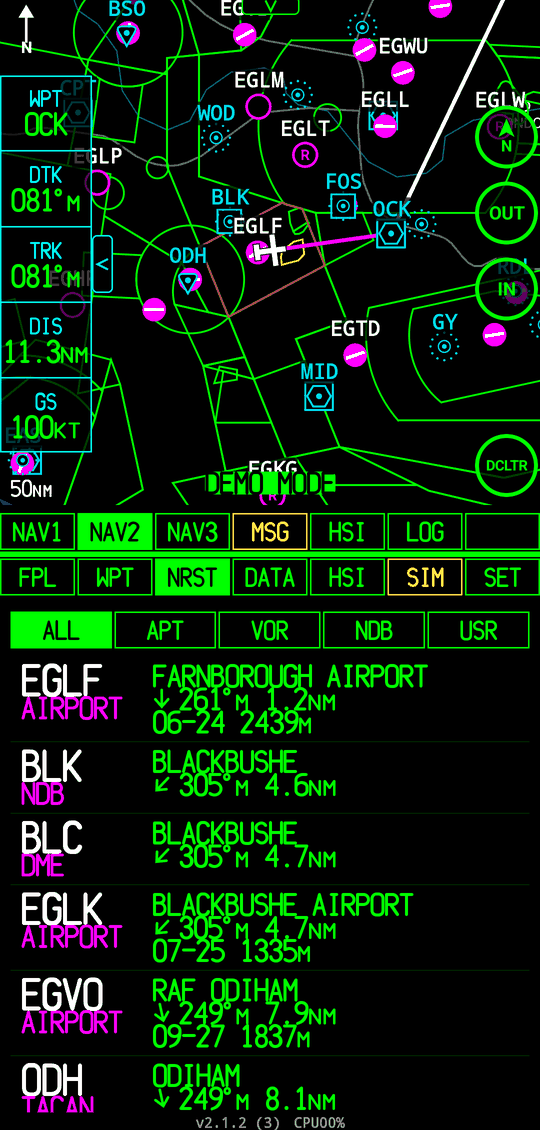
NRST — nearest
The nearest waypoints, closest first, with bearing and distance from you and an arrow pointing to each, relative to your track. Filter with ALL, APT, VOR, NDB or USR (your user waypoints). Airport rows also give the longest runway.
Tap a row to open it on the WPT page (for D→, +FPL …). The list refreshes on its own: faster when you are moving fast, at once after a jump in position.
While NRST is on screen, the maps show the same kind of waypoint as the filter, ignoring the waypoint ranges.
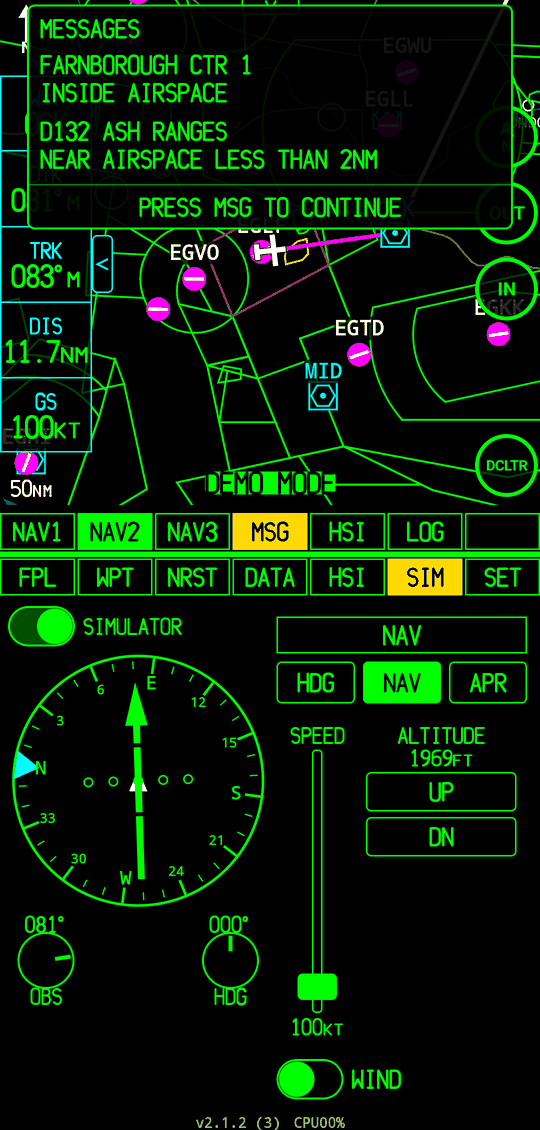
MSG — messages
The MSG button opens a message window over the upper section. Messages are airspace alarms (see Airspace and alarms), for example:
- INSIDE AIRSPACE
- NEAR AND AHEAD — within 2 NM and you will be inside within 10 minutes
- NEAR AIRSPACE LESS THAN 2NM
- AIRSPACE AHEAD LESS THAN 10 MIN
A new message makes the MSG button blink filled yellow until you have seen it, and plays a tone once (AUDIBLE MSG ALERT). Press MSG again to close the window.
With AUTO MSG on, the window opens by itself when there is a new message and closes after a countdown long enough to read it (4–30 s).
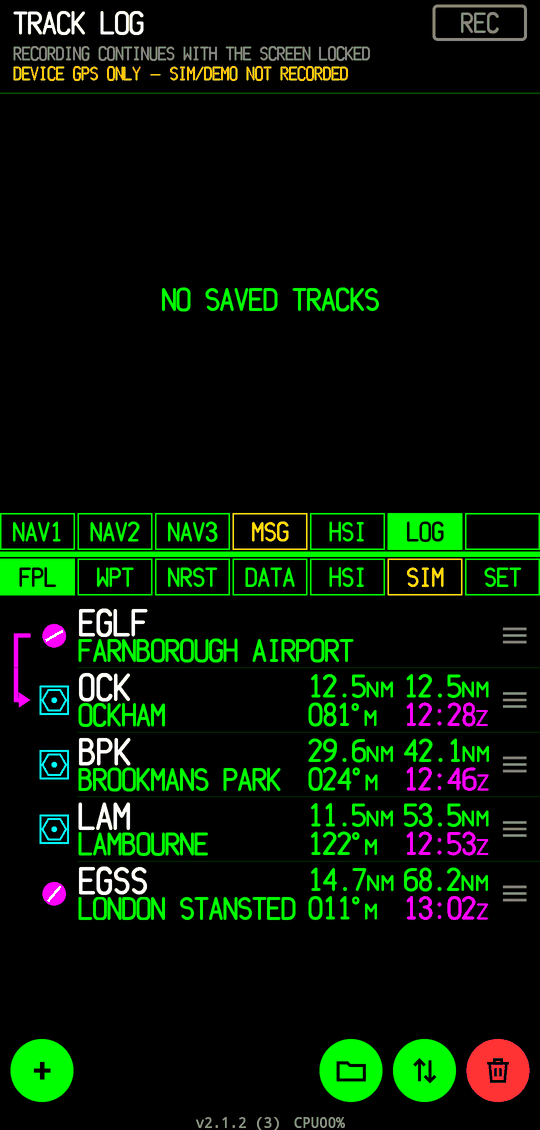
LOG — track log
Records your flight to a file. Press REC to start and STOP to end. Recording continues with the screen off or the app in the background (Android shows a notification), and the status strip shows ● REC.
A point is stored at least every 15 s, or every 25 m when moving, and immediately written to the file, so even a crash loses almost nothing. Poor fixes (worse than 100 m) are skipped.
Each saved track shows its date, duration, distance and points, with buttons to share it as CSV or GPX (for Google Earth, logbooks, …) or delete it (DEL).
Only the device GPS is recorded. REC is disabled in DEMO MODE and with X-Plane.
SET > BREADCRUMB > SAVE shares the map's breadcrumb trail as a GPX file too.
SIM — simulator
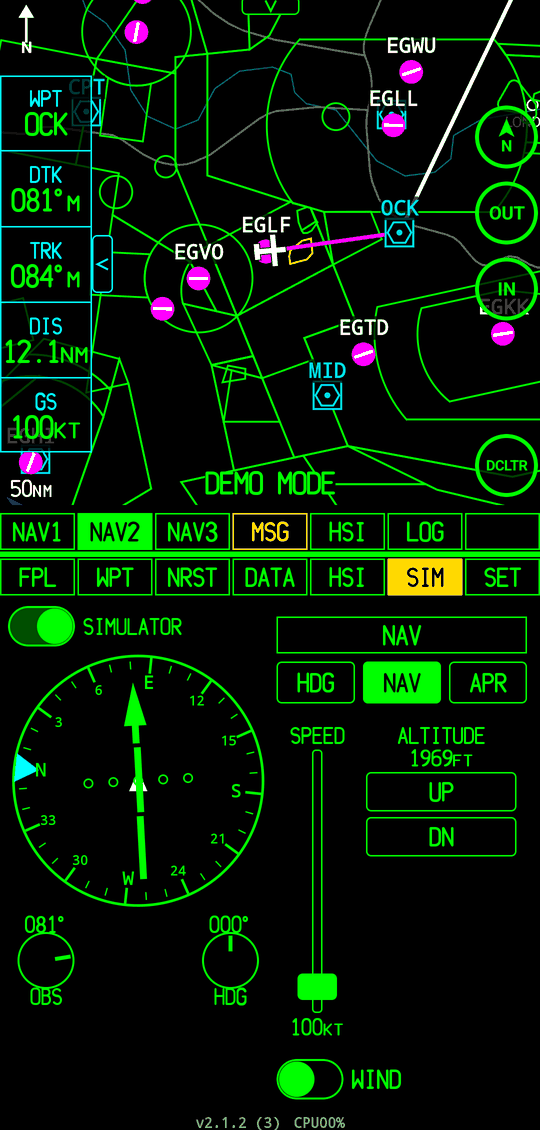
A small flight simulator for learning the app on the ground. Turn on SIMULATOR (or SET > DEMO MODE > SIM). The aircraft starts at the first waypoint of the flight plan with leg 1 active and the autopilot in NAV, and flies the plan. Without a plan it starts at your last position. The SIM button turns yellow while the simulator flies.
- The mini HSI shows the simulated aircraft, with an OBS knob and a HDG bug knob — drag them.
- Autopilot modes like a KAP 140: HDG follows the bug; NAV arms and captures the course to the active waypoint; APR as NAV with tighter tracking. With none selected, the autopilot holds wings level (ROL). The annunciator shows the active and armed modes.
- The SPEED lever sets the speed (0–1000 kt).
- ALTITUDE UP/DN in 100 ft steps (hold to repeat); the aircraft climbs and descends at 500 fpm.
- WIND adds the real winds aloft at the aircraft's position and altitude (needs an internet connection); the aircraft drifts and the autopilot crabs to hold the course.
Every page works as in flight, so the simulator is the easiest way to explore the app.
6. The moving map
NAV1 and NAV2 share the same map. It shows, from bottom to top: sea and land, rivers, roads and cities, airspace boundaries, your breadcrumb trail, the flight plan (magenta active leg, white other legs), waypoint symbols and labels, runways drawn to scale when zoomed in, traffic and your own aircraft.
- The track line ahead of the aircraft shows where you will be in a set distance or time (SET > TRACK LINE).
- The breadcrumb is a trail of where you have flown (SET > BREADCRUMB), kept until cleared.
- Each kind of waypoint is shown only below its own range (SET > WAYPOINT RANGES), and labels that would overlap are hidden, so the map stays readable. Flight-plan waypoints are always shown.
Controls
| Control | Action |
|---|---|
| OUT / IN | Step the range out or in. With a waypoint selected, IN zooms around it. |
| Pinch | Zoom smoothly to any range. |
| Drag | Pan the map (NAV2 only). The aircraft then moves across a still map. |
| N / DTK / TK | (NAV2) Cycle orientation NORTH UP → DTK UP → TRACK UP, or re-centre after panning. |
| DCLTR | Cycle the declutter level (below). |
| Tap | Select a waypoint, traffic or airspace. |
| Long press | Drop a +MAP point at that position. |
AutoZoom (SET > NAV1/NAV2 AUTOZOOM) picks the range so that the active waypoint stays on the map, zooming in as you get closer.
Selecting things
Tap a waypoint to open its panel at the top of the map: identifier and name, distance and bearing from you, position, and buttons D→ and +FPL. A dashed line joins it to your aircraft. Tap the panel text to open the waypoint on the WPT page; tap the waypoint again to close the panel. Airports win over navaids at the same spot.
Tap inside an airspace (away from waypoints) to show its name, class, floor and ceiling. Where several airspaces overlap the smallest is shown first; tap again to step through them, or tap the panel for a list.
Long-press anywhere for a +MAP point: D→ or +FPL to use it as a waypoint (named WPT-01, WPT-02 …), or +USER to save it as a user waypoint.
Declutter (DCLTR)
Each map page has its own declutter level, shown next to the range. Like the CLR key on a GNS 430, each press of DCLTR removes more:
| Level | Map shows |
|---|---|
| (none) | Everything |
| -1 | No roads or cities |
| -2 | No airspace more than 1000 ft above you |
| -3 | No airspace |
| -4 | Only the flight plan |
Traffic is only shown with declutter off.
Airspace and alarms
Airspace boundaries are drawn in a colour and line style per class (B/TMA, C/TCA, D, restricted/danger/ prohibited, military, other). Each class can be turned on or off and given a maximum map range in SET > AIRSPACE; HIDE AIRSPC ABOVE hides airspace whose floor is above a set altitude. The colours, line styles and which classes give alarms are set in AIRSPACE COLORS / LINE STYLES….
Airspace alarms check every airspace within 15 NM twice a second, using your GPS altitude against the floor and ceiling (plus an adjustable vertical buffer), whatever the map is showing. An airspace you are inside is outlined red and blinks until you have read the message; one you are near or heading into is outlined yellow. While the MSG window is open, alarmed airspace is drawn even if declutter or range would hide it. See MSG.
Traffic
With SET > TRAFFIC on, nearby aircraft are drawn on the map with ForeFlight-style symbols: an arrow pointing along their track, with the relative altitude above it (hundreds of feet, + above / − below), a climb/descent arrow when climbing or descending faster than 500 fpm, and the callsign below once zoomed in. Aircraft on the ground are brown. Tap one for details. Positions are extrapolated between reports so the targets move smoothly.
- Caution (amber): within 2.0 NM and ±1200 ft, or closest approach within 45 s.
- Warning (red): within 1.3 NM and ±1200 ft, or closest approach within 25 s. Held red for 15 s.
Traffic is shown only with declutter off and with the map range at or below TFC RNG. The source follows GPS SOURCE: with the device GPS it comes from the OpenSky Network over the internet (refreshed every TFC UPDATE seconds); with X-Plane, from the simulator's traffic.
OpenSky limits anonymous use. If the status reads LIMIT REACHED, create a free OpenSky account, make an API client and enter its client ID and secret under OPENSKY ACCOUNT…; they are stored encrypted on the phone.
Wind
NAV2 shows a wind arrow next to the range label, pointing where the wind blows to, with direction/speed (e.g. 240/15). Below 1000 ft above the nearest airfield it is the surface wind from the nearest METAR; higher up, the forecast wind aloft at your altitude (Open-Meteo). Both need an internet connection and are refreshed as you move.
7. Data fields
Data fields appear on DATA, NAV1 (corners), NAV2 (table), NAV3 (grid) and HSI (corners). Each can show any of the following. A field with no value shows dashes. Units follow the SET page.
| Field | Shows |
|---|---|
| DEST | Destination identifier (tap it on DATA to choose a new destination) |
| DIS | Distance to the destination |
| BRG | Magnetic bearing to the destination |
| HDG/TRK (AUTO) | Compass heading or GPS track, chosen by COMPASS REF |
| HDG | Phone's magnetic heading (compass) |
| TRK | GPS track over the ground, magnetic |
| GS | Ground speed |
| ETE | Estimated time en route to the destination |
| TIME (LOCAL) | Current local time |
| TIME (UTC) | Current UTC time |
| ETA | Estimated time of arrival at the destination, UTC or local (two separate fields) |
| GPS ALT | Altitude (barometrically fused when BARO FUSION is on) |
| VS | Vertical speed (inertial, barometric or GPS — the best available) |
| VSR | Vertical speed required to reach the destination 1000 ft above it |
| ALT BARO | Barometer/GPS fused altitude |
| VS BARO | Vertical speed from the barometer only |
| VS GPS | Vertical speed from GPS altitude only |
| VS INRT | Vertical speed from accelerometer + barometer (INERTIAL VS) |
| BARO PRESS | Ambient pressure from the phone's barometer, hPa |
| BARO REL | Barometric altitude change since the app started |
| BARO-GPS | Fused altitude minus GPS altitude |
| ACC BIAS | The inertial filter's accelerometer bias estimate |
| MAG VAR | Magnetic variation at your position |
| GPS ACC | GPS horizontal and vertical accuracy |
| POS | Current position (POSITION FRMT) |
| DTK | Desired track of the leg (or OBS / approach course) |
| XTK | Cross-track error: distance off the course line and which way to steer (L/R) |
| TKE | Track angle error: track minus DTK |
| ROT | Rate of turn, °/s |
| FPL DEST | Last waypoint of the flight plan |
| DIS TOT | Total remaining distance along the flight plan |
| ETE TOT | Total time en route to the end of the flight plan |
| LEG | The active leg (FROM → TO) |
| OFF | Field blank |
The barometer fields need a phone with a pressure sensor (they say NO BARO otherwise); VS INRT and ACC BIAS also need a gyroscope (NO IMU) and INERTIAL VS on.
8. Settings (SET)
All settings are saved the moment you change them. Steppers (− / +) step through the map range values.
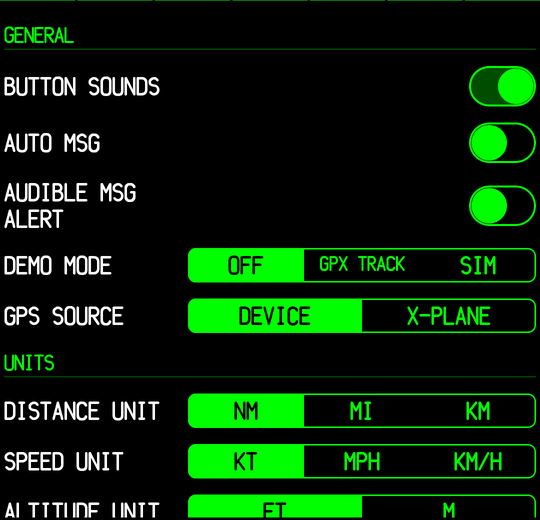
General
| BUTTON SOUNDS | Key click on button presses |
| AUTO MSG | Open the MSG window automatically for new messages |
| AUDIBLE MSG ALERT | Tone for a new message |
| DEMO MODE | OFF (real position), GPX TRACK (replays a recorded flight), SIM (simulator) — see Position sources |
| GPS SOURCE | DEVICE or X-PLANE |
Units
| DISTANCE UNIT | NM, MI, KM |
| SPEED UNIT | KT, MPH, KM/H |
| ALTITUDE UNIT | FT, M |
| RUNWAY UNIT | FT, M |
| POSITION FRMT | DEG (decimal degrees), D M (degrees, decimal minutes), DMS |
| FPL ETA | Flight-plan ETAs in UTC or LOCAL time |
Map
| MAP ORIENT | NAV2 orientation: NORTH UP, DTK UP, TRACK UP |
| NAV1/NAV2 AUTOZOOM | Range follows the distance to the active waypoint |
| POS SYMBOL | Own-ship as an AIRCRAFT or a TRIANGLE |
| SEA/LAND | Coastlines and sea shading |
| RIVERS · RIVER RNG | Rivers, and the largest range they show at |
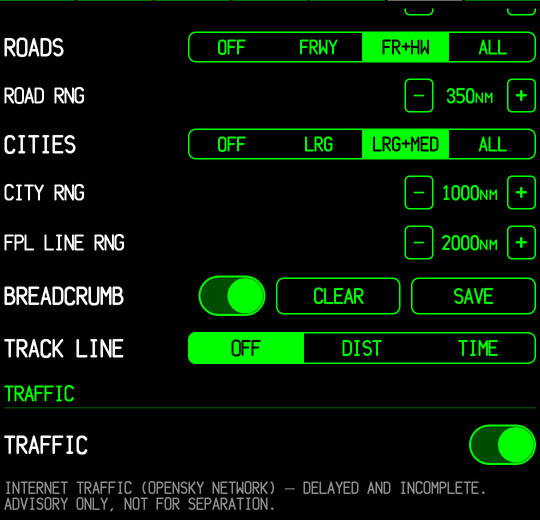
| ROADS · ROAD RNG | OFF, freeways, freeways + highways, ALL |
| CITIES · CITY RNG | OFF, large, large + medium, ALL |
| FPL LINE RNG | Largest range the flight plan line is drawn at |
| BREADCRUMB | Show the trail; CLEAR it; SAVE it as GPX |
| TRACK LINE | OFF, a line DIST nautical miles ahead, or TIME minutes ahead |
Traffic
| TRAFFIC | Show traffic on the map |
| TFC RNG | Largest map range traffic is shown and fetched at |
| TFC UPDATE | OpenSky refresh interval |
| OPENSKY / X-PLANE | Feed status (e.g. NO CONNECTION, LIMIT REACHED) |
| OPENSKY ACCOUNT… | Your OpenSky API client credentials |
Airspace
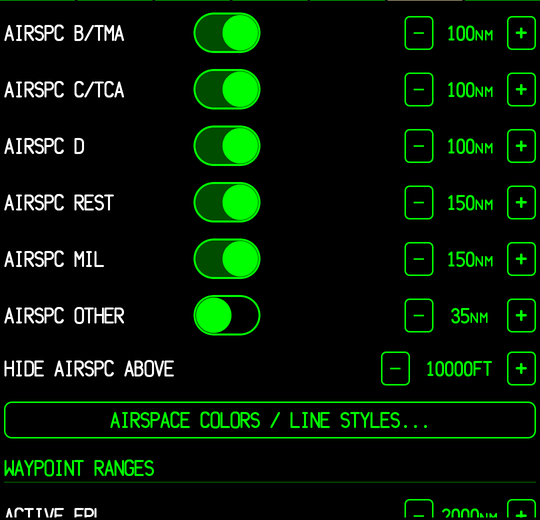
| AIRSPC … | Per class: switch on/off and maximum map range |
| HIDE AIRSPC ABOVE | Hide airspace with a floor above this altitude |
| COLORS / LINE STYLES… | Colour and line style per class, alarm classes, vertical buffer |
Waypoint ranges
The largest map range at which each kind of waypoint is shown: ACTIVE FPL, LARGE / MEDIUM / SMALL APT, INT (intersections), NDB, VOR, USER.
Navigation
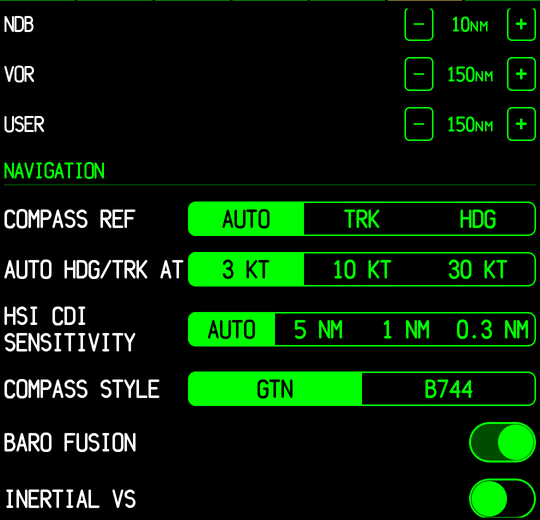
| COMPASS REF | HDG: phone compass · TRK: GPS track · AUTO: compass when slow, track when moving |
| AUTO HDG/TRK AT | Speed above which AUTO uses the track (3, 10, 30 KT) |
| HSI CDI SENSITIVITY | AUTO, 5 NM, 1 NM, 0.3 NM |
| COMPASS STYLE | GTN or B744 card |
| BARO FUSION | Combine the barometer with GPS for altitude and VS |
| INERTIAL VS | Add the accelerometer for faster VS (needs BARO FUSION) |
| GPS SMOOTHING | Kalman filter on the GPS position: OFF, LOW, MED, HIGH |
| MIN VS DISPLAY | Smaller vertical speeds read 0 (5, 25, 50 FPM) |
| ROUND VS TO | EXACT, 50 FT, 100 FT |
| ROUND GPS ALT | EXACT, 10 FT, 100 FT |
A phone's compass is unreliable in a cockpit; in flight the GPS track (TRK or AUTO) is usually the better choice. HIGH smoothing gives the steadiest track but can lag in sustained turns.
Data fields
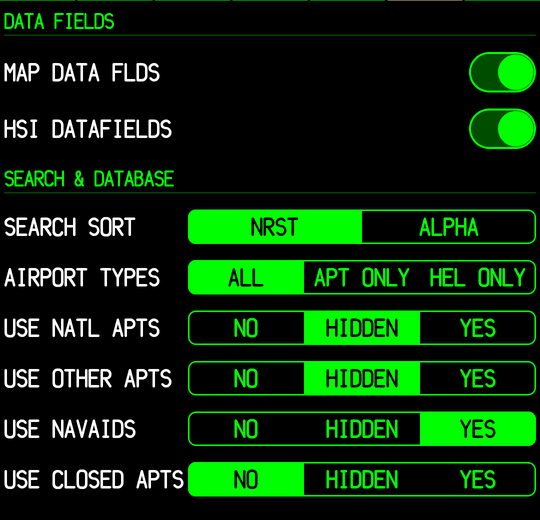
| MAP DATA FLDS | Show NAV2's field table |
| HSI DATAFIELDS | Show the HSI page's corner fields |
Search & database
| SEARCH SORT | Browse list nearest first (NRST) or alphabetical (ALPHA) |
| AIRPORT TYPES | ALL, airports only, heliports only |
| USE NATL APTS | Airports with only a national identifier |
| USE OTHER APTS | Airports with other local identifiers |
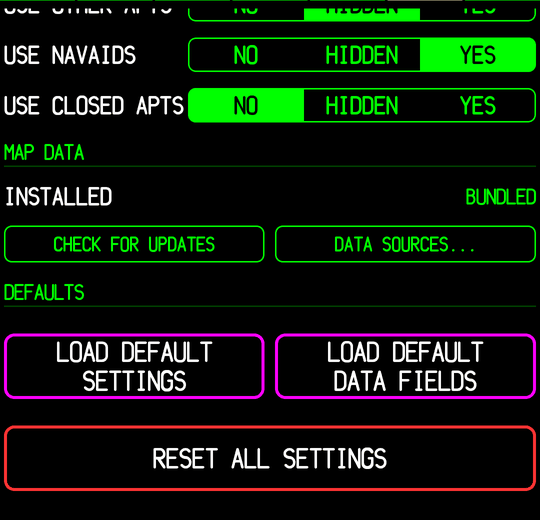
| USE NAVAIDS | Navaids |
| USE CLOSED APTS | Closed airports |
The last four take NO (never used), HIDDEN (found when searched for by identifier, but not in browse lists, NRST or the automatic destination) or YES.
Map data and defaults
| INSTALLED | Map data version (BUNDLED = the data that came with the app) |
| CHECK FOR UPDATES | See Map data |
| DATA SOURCES… | Each data layer, its source and date |
| LOAD DEFAULT SETTINGS | Reset settings to the recommended values; the page layout is kept |
| LOAD DEFAULT DATA FIELDS | DATA page fields to DEST, ETE, VS, ETA UTC, POS, ALT |
| RESET ALL SETTINGS | Everything back to a fresh install, including the tab bars (after a confirmation) |
9. Position sources
Device GPS
The normal source (DEMO MODE OFF, GPS SOURCE DEVICE). Keep the phone where it can see the sky — on the glare shield or near a window. GPS SMOOTHING, BARO FUSION and track recording apply only to the device GPS.
DEMO MODE
- GPX TRACK replays a recorded flight in real time, so you can watch the pages working on the ground.
- SIM flies the simulated aircraft of the SIM page.
A yellow DEMO MODE badge is shown on the map and instrument pages whenever the position is not real. Switching source clears the breadcrumb.
X-Plane
Set GPS SOURCE to X-PLANE to use the app as a GPS for the X-Plane flight simulator. In X-Plane, open Settings › Network and enable Broadcast to 3rd-party apps (port 49002). Phone and computer must be on the same Wi-Fi network. Traffic from X-Plane's AI aircraft and multiplayer (XTRAFFIC) is shown as traffic. GPS SOURCE returns to DEVICE each time the app starts.
10. Map data
The app ships with its database: airports, runways, frequencies and navaids from OurAirports, airspace from OpenAIP, and coastlines, rivers, roads and cities from Natural Earth.
To update it, go to SET > MAP DATA and press CHECK FOR UPDATES (needs an internet connection; nothing is checked automatically). If a newer version is available, press DOWNLOAD. Each file is checked before it replaces the old one, so an interrupted download never leaves you with broken data. The new data is loaded in the background; you can keep using the app.
DATA SOURCES… lists each layer, whether it is bundled or downloaded, and its date.
11. Tips and troubleshooting
Suggested layouts
- Cross-country: NAV2 above, FPL below — switch the lower section to NRST when you need a field.
- Approach: NAV1 above, HSI below with VIS APCH.
- Tracking a radial: HSI above with OBS, DATA below.
Common questions
- The map or instruments don't move.
- Check that location permission is allowed and that DEMO MODE is OFF and GPS SOURCE is DEVICE. A NO GPS FIX badge means the phone has no position yet.
- The heading jumps around.
- The phone's compass is disturbed by the aircraft. Set COMPASS REF to TRK or AUTO.
- Altitude differs from the altimeter.
- GPS altitude is geometric and is not corrected for pressure; it can differ by a few hundred feet from the barometric altimeter. Always fly the aircraft's altimeter.
- No weather, no traffic, no wind.
- These need an internet connection. The app keeps the last data it received and says so.
- Traffic says LIMIT REACHED.
- OpenSky's anonymous quota is used up; add an OpenSky account (SET > TRAFFIC).
- A page says MODE NOT DEFINED.
- That slot is empty. Long-press its button and choose a page.
- I want the factory layout back.
- SET > RESET ALL SETTINGS.